 |
| Pic 1: Cherish Flower Ball |
What we need:
16 pcs 7.5 cm patterned origami paper
16 pcs 7.5 cm purple coloured origami paper (or any that matches your patterned origami paper)
Needle
Sewing thread
1 m purple coloured ribbon
 |
| Pic 2: Meterials |
Now, the how-tos.
Like the previous flower ball, The Star, there are also two parts to the flower. The petals (outer), and pistils (inner). Lets work on the petals.
 |
| Step 1: Start of Valley fold the paper with the patterned side up to form a Fruit base. |
 |
| Step 2: Working on Side B. Fold the right and left flaps parallel to the center along the dashed line, ensuring the corners meet each other in the center. |
 |
| Step 3: Repeat Step 2 on the three remaining Side Bs. |
 |
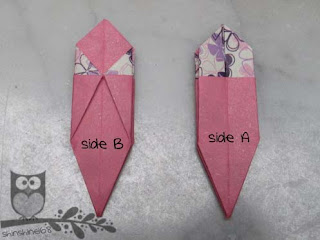
| Step 4: This is what we have upon the completion of Step 3. Flip the right flap of Side B to the left, and we have Side A in the picture. We're now gonna be working with Side A facing us. |
 |
| Step 5: Inside Reverse fold the "petals" (Side B) with the middle crease perpendicular to the center crease. |
 |
| Step 6: Repeat Step 5 to the remaining Side Bs. |
 |
| Step 7: Side view and Top view upon completion of Step 6. |
 |
| Step 8: With Side A still facing us, do a Outside Reverse fold along the dashed line. |
 |
| Step 9: Outside Reverse fold. |
 |
| Step 10: Outside Reverse fold on all four sides. |
Now, the pistils - Inner part of the flower.
 |
| Step 11: Start of Valley fold the paper with the coloured side up to form a Fruit base. |
 |
| Step 13: Fold the upper pointy part along the dashed line. Repeat on all four sides. |
 |
| Step 14: This is what we have upon the completion of Step 13. |
 |
| Step 16: Repeat Step 15 on all four side Bs. |
Now, we have 16 petals and 16 pistils. Here's how to combine them:
 |
| Step 17: Ready set go!! Here's what they look like. |
 | |
| Step 18: Insert Side B of pistil behind Side B of petal. Adjust each corners so they sit nicely with its corresponding sides (eg. Side A of pistil behind Side A of petal). |
Combining the individual flowers are done. Now, it's time to thread them together to produce the flower ball.
 |
| Step 19: Thread through Side A of the flowers. |


0 comments:
Post a Comment