Feeds RSS
Feeds RSS

Wednesday, 27 June 2012

Flower Ball #2 - Cherish

Here is one of my favs of the flower balls - Cherish.  It's simple, easy to make, and looks just as nice as The Star.

Pic 1:  Cherish Flower Ball


What we need:
16 pcs 7.5 cm patterned origami paper
16 pcs 7.5 cm purple coloured origami paper (or any that matches your patterned origami paper) 
Needle
Sewing thread
1 m purple coloured ribbon


Pic 2:  Meterials
The pink and white coloured paper on the right side are the colours of the back of the patterned and purple papers.  It doesn't matter what the colour of the backs are.  I decided to show it so you know what papers I have.  ^^  I just hope it doesn't add to the confusion.  ^^


Now, the how-tos.


Like the previous flower ball, The Star, there are also two parts to the flower.  The petals (outer), and pistils (inner).  Lets work on the petals.


Step 1:  Start of Valley fold the paper with the patterned side up to form a Fruit base.

Step 2:  Working on Side B.  Fold the right and left flaps parallel to the center along the dashed line, ensuring the corners meet each other in the center.

Step 3:  Repeat Step 2 on the three remaining Side Bs.

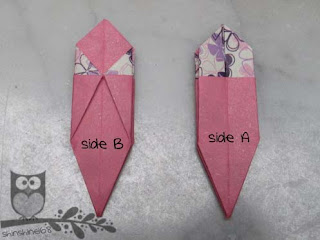
Step 4:  This is what we have upon the completion of Step 3.  Flip the right flap of Side B to the left, and we have Side A in the picture.  We're now gonna be working with Side A facing us.

Step 5:  Inside Reverse fold the "petals" (Side B) with the middle crease perpendicular to the center crease.

Step 6:  Repeat Step 5 to the remaining Side Bs.

Step 7:  Side view and Top view upon completion of Step 6.

Step 8:  With Side A still facing us, do a Outside Reverse fold along the dashed line.

Step 9:  Outside Reverse fold.

Step 10:  Outside Reverse fold on all four sides.
We have just completed one of the petals.  Fifteen to go.


Now, the pistils - Inner part of the flower.

Step 11:  Start of Valley fold the paper with the coloured side up to form a Fruit base.

Step 12:  Working on Side B.  Fold one flap on the right and one flap on the left towards the center crease along the dashed lines, ensuring they meet in the center.  Repeat on all four sides of Side Bs.

Step 13:  Fold the upper pointy part along the dashed line.  Repeat on all four sides.

Step 14:  This is what we have upon the completion of Step 13.

Step 15:  This is a tricky part.  It's not quite an Inside Reserve fold, but similar.  Working on Side B.  Hold the center and fold to the left along the dashed line, repeat on the right hand side.  Squeeze them together to form a "V" - the picture on the right.

Step 16:  Repeat Step 15 on all four side Bs.
 Alright, the pistil is ready, repeat Step 11 - 16 to make a total of 16 pistils.


Now, we have 16 petals and 16 pistils.  Here's how to combine them:


Step 17:  Ready set go!!  Here's what they look like.

Step 18:  Insert Side B of pistil behind Side B of petal.  Adjust each corners so they sit nicely with its corresponding sides (eg. Side A of pistil behind Side A of petal).

Combining the individual flowers are done.  Now, it's time to thread them together to produce the flower ball.

Step 19:  Thread through Side A of the flowers.


Tuesday, 26 June 2012

Flower Ball #1 - Finishing - Part 3 of 3

Last part of making The Star!!  ^^  Won't take you more than 5 mins.

Continuing from Part 2.  We have 3 circles that we're gonna stack together with a ribbon.

What you need in this part:
1 m yellow coloured ribbon
Scissor

Here we go:
Step 1:  Half the 1 m ribbon and do an overhand knot in the center.  Cut open the closed part of the ribbon to have four loose strings. 

Step 2:  Pull apart so they are perpendicular to each other.  I like to tie a loose knot on two of the opposite strings, so I can easily identify which ones are the direct opposite of each other.

Step 3:  Place the center of the lower part of the flowers on the center of the ribbon.

Step 4:  One by one, pull the four ribbons towards the center of the flowers.  It's better to work on the ribbons that are opposite of each other (eg. pull one end that is loosely tied, followed by the other side that is also loosely tied).  This will ensure that the circle of flower remain centered, and the ribbon is placed tight within the flowers.

Step 5:  Stack on the middle row and repeat Step 4.

Step 6:  Use one of your hand to pull the ribbon up, while fingers on the other hand pushing down on the flowers.  This is to ensure that the flower ball formed will be nice and tight.

Step 7:  Stack on the upper part and repeat Step 6.

Step 8:  At this stage, bring closer the ribbons so you have 2 on the right, and 2 on the left.
Step 9:  Secure the ribbon by tying a knot tightly.  Twice would be sufficient.

Step 10:  Take one ribbon from each side and tie a ribbon on top, leaving the other two ribbons on each side.

Step 11:  Now, take one of the remaining ribbons and slowly work its way down, placing it between the ring of flowers until you reach the center at the bottom of the flower ball.  Make sure that the ribbon is as close to the center as it could be.  Do the same with the ribbon on the other side.

Step 12:  It's ready.  Yeay!!  ^^

Once you are ready placing the ribbons where they are, gently shape the flowers so they make a close to perfect round shape.  Place them in a way that they are close to each other and hiding the top and bottom part where the knots sit.

It's finally ready!!!  Woohoooo!!  You sure can use it many ways.  It makes pretty table top decorations - just cut all the ribbons very close to the center knots so none of them are showing.


Here we go, the very first flower ball - The Star.  Please leave comments, and please share some pics if you decided to make one.  ^^

Wednesday, 6 June 2012

Flower Ball #1 - Threading - Part 2 of 3

Yeay!!  We are done with the foldings.  Now, get your thread and needle ready, we're going to put everything together.

In order to get a full round shape out of our 22 flowers, we need to separate it into three section - the lower/bottom, mid, and upper/top section.  To make The Star, we're gonna have 7 flowers on the lower part, 8 on the mid section, and 7 on the top.  This makes up to 22 flowers, and finally our flower ball.  So, let get into it.  We're almost there.  ^^

This is what you're going to need in this part:
22 flowers from Part 1
1 meter of matching coloured ribbon
Needle
Thread of any colour (it won't be visible on your final masterpiece ^^).  No need to tie any knots after threading through the needle.
 
Pic 1:  What we need.
And here is how to assemble them:
Step 1:  We will be threading through the smooth side of the flower.  (The black line in the pic represents the needle, I know, it looks crooked... Sowwy ^^)

Step 2:  Now, prepare 50 cm of thread and loop it through the needle, keeping the end of the thread unknot.  Leave about 5 cm of thread from the first inserted flower.

Step 3:  This is what it looks like after three flowers.  Keep going until you have seven flowers inserted like below.

Step 4:  We are almost done with the lower part of the flower ball.  Start adjusting the flowers so the pointy white part of each flower touches each other, and naturally, it will curl up to form a circle.  Remember to leave a relatively equal length of thread on the two flowers on the end.

Step 5:  Tie an overhand knot (the simplest knot we do everyday, but never know the name of it).  Tighten by repeating it 3 times to get the picture on the right.  Once done, cut the thread as close to the knot as possible.

Step 6:  Repeat Step 2 to Step 5 to get 3 separate flower circles.  2 circles with 7 flowers on it, and 1 circle with 8 flowers on it.
 
We are now one step closer to completion.  Get your ribbon ready!!!!  ^^