Feeds RSS
Feeds RSS

Thursday, 31 May 2012

Flower Ball #1 - The Star - Part 1 of 3

Here's the very first flower ball I'm gonna be showing you, named "The Star".  This blog is the first part of three.  Part 1:  Flower Origami.  Part 2:  Threading Flowers.  Part 3:  Final Finishing.

With making flower ball, there are gonna be a lot of repetition.  It can be frustrating at times, but you are sure to get better with each fold.  ^^

Here's what we're gonna need:
22 pcs 7.5 cm orange coloured paper
22 pcs 7.5 cm brown coloured paper
Needle
Sewing thread
1 m yellow coloured ribbon

There are two parts in making a flower.  The petals (outer part) and the pistil (inner part).  In this case, we're gonna be using the orange paper as the petals and the brown paper as the pistil.  In total, we'll be making 22 flowers to make one flower ball.


Of course, it is up to you to select a cute colour combination of your liking to make "The Star".  One of the most popular is light blue as petals and dark blue as pistil.

Let's start with the petals:
Step 1:  Start of Valley fold the paper with the coloured paper side up to form a Fruit base.

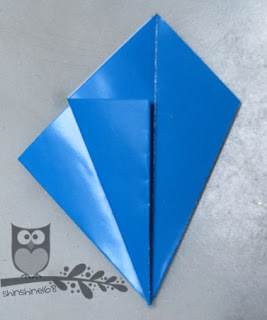
Step 2:  Flip the upper right flap of Step 1 to the left, to get the full coloured side.  Fold and crease well along the dashed line.

Step 3:  Flip over, repeat Step 2.

Step 4:  Repeat Step 2 and 3 to all four full coloured sides.

Step 5:  Different sides and views of the paper.

Step 6:  Inside Reverse fold the "petals" with the middle crease perpendicular to the center crease.
Step 7:  This is what we have upon the completion of the Inside Reverse fold on the four modified sides.
Do this 22 times on the orange coloured paper, and we have 22 petals on stand-by.  ^^
 
Now that the petals are ready, we are ready to move on to the next section of the flower, the pistil.  This time, we are gonna be working with the brown coloured paper.  And this is how we're going to make it:

Step 1:  Start with a paper with the coloured side down to make a Fruit base.  On the half coloured side, Valley fold the flaps along the dashed lines, leaving about a third white part on each side.  Ensure that the sides of the flaps are parallel to the center crease.

Step 2:  Repeat Step 1 on the other side, and flip the flaps over and repeat on the remaining two sides.

Step 3:  This is what it looks like after Step 2.

Step 4:  Flip to the smooth side, fold and crease well along the dahsed line.  Fold as low as it could naturally go.  Repeat until all four sides are completed.

Step 5:  Finished pistil.

Repeat this to get 22 pistils.  And now we have both parts of the flower, like this:
Pic 1:  Petal and Pistil.

 Now, lets combine the two to make a complete flower, like this one:
Step 1:  Take Side B of the pistil and insert so it sits nicely right behind the smooth side of the petal.

Step 2: Repeat to get 22 flowers.

Once we have all the flowers sits nicely like this, we are ready to move on to Part 2:  Threading Flowers.
Pic 2:  22 Flowers and Pistils combined.
Get your thread and needle ready!!  ^^

Monday, 28 May 2012

Terminology - Inside and Outside Reverse Fold

Here is another technique that is often used to make the "head" or "tail" of an animal in origami.  Inside Reverse Fold is the one used in making "head" of animal, and Outside Reverse Fold as its "tail".

The Inside Reverse Fold also makes perfect petals for the flowers that we're gonna be making.

Here's the illustration of the Inside Reverse Fold:
Step 1:  Mountain fold a square paper into a triangle.  Make another mountain fold at the corner along the dashed line.
Step 2:  Fold, crease well, then unfold.

Step 3:  Pry open the paper, and push down the middle crease (arrow sign) in-between the two sides of the paper.

Step 4:  Press and flatten the paper.

Looks like a "head" of an animal, doesn't it?

Now, let's work on the Outside Reverse Fold:
Step 1:  Valley fold along the dashed line.

Step 2:  Valley fold only the top layer, crease well.

Step 3:  Flip over the paper to see the existing mountain fold.

Step 4:  Valley fold the top layer of the paper along the existing crease line.

Step 5:  Pry open the paper.  Flip the center outward.

Step 6:  Back and side view of the paper.  Close and flatten the two flaps, ensuring the corner stays outward and forms a sharp pointy corner as per existing crease line.

Step 7:  Flatten and rotated 90 degree to from a "tail" like end. 

Thursday, 24 May 2012

Terminology - Squash Fold

Everyone has done a Squash Fold before, we just never knew it was called a Squash Fold. ^^

A Squash Fold consists of two parts, i.e. open up a fold and then press and flatten to form a fold.

There are many different type of Squash Fold, but they possess the same approach - open and flatten.

To make a flower ball, we will be doing a lot of Squash Fold, both in making the Square Base and the Fruit Base.

Below is the example of a Squash Fold applied on a Square Base and Fruit Base:


Step 1:  Start of by folding a square paper diagonally to form a large triangle, then bring the flap to the left to produce the above pic.

Step 2:  Fold the upper half flap (bringing it to the right) to form a smaller triangle (corner meets corner).  It's the crease that we are after.  When folded neatly, the crease will help to paper to fall into place on the next step.  Pry open the paper where the arrow is pointed to get the below pic.

Step 3:  This is the "open" part of a Squash fold.

Step 4:  This is the "flatten" part of a Squash fold.
Step 1 to 4 are the example of Squash fold on a Square base.  Below is the example of Squash fold on a Fruit base.
Pic 1:  Squash fold on a Fruit base.
There we go, Squash fold.  Easy as.  ^^  Drop me a line or two if it gets confusing.

Terminology - Fruit Base

This base is referred to as a Fruit Base due to its diversity as a starting point for the creation of volumetric items, such as flowers, vegies, fruits, etc.  This base uses Square Base as its foundation.

This base is the starting point for almost all items in our flower ball origami series.  ^^

Here are the instructions:
Step 1:  This is a Square Base.  This picture has the opening side on the top, and closed side down the bottom.
Step 2:  Valley fold the right flap so the side lies vertically against the center crease.  Do a Squash fold here - unfold and open up the flap to create image of Step 3.


Step 3:  Squash down neatly along the crease to form a triangle.

Step 4:  This is the result.  We want to repeat Step 2 and 3 on the remaining flaps.

Step 5:  Flip to paper to repeat Step 2 and 3.

Step 6:  Valley fold the left flap.  Unfold and open as per Step 2 - another Squash fold here.

Step 7:  Squash fold.  Crease well.

Step 8:  Fruit Base - Half and Full Coloured side.
Nice job!!  You have created a Fruit Base.  ^^

Now, have a look at the Fruit Base you have just created.  You will find that there are 8 sides to this base.  They consist of 4 half coloured sides, and 4 full coloured side.
And you will also find that the sides alternate each other.

Which side we start of with, is dependent on the design of the flower ball we decided to make.

Yeay, so now that we've covered the basics, we are ready for the fun part.  Get ready!!  ^^

Terminology - Square Base

There are a number of bases that starts off an origami.  We are gonna be focusing on making flower balls, and they use Square Base as the foundation of every fold.

There are a few ways of making a Square Base.  I'm gonna be illustrating one of the many ways here.  (Some are just better explained through video.  Hopefully I'd get to it one day... ^^)

Please note:  The illustrated Square Base is folded with the coloured side down.  Depending on the design of the flower ball, we may have to start off a Square Base with the coloured side up.

Here it is:
Step 1:  Start with a square paper.  Valley fold diagonally along the dashed line to form a triangle.

Step 2:  Valley fold it in half along the dashed line to form a smaller triangle.

Step 3:  Take one flap and Valley fold it in half.  Crease well.  Two Valley fold is created from this.

Step 4:  Squash fold by open out the top flap to the right along the new crease line.  The Valley fold on the left sits nicely into the fold, but the one on the right doesn't.  Re-fold the crease to create a Mountain fold.

Step 5:  Squash paper down neatly along the crease line to form a square.

Step 6:  Flip the paper over.  Fold along the dashed line.

Step 7:  This is a repetition of Step 3.

Step 8:  This is a repetition of Step 4.  Another Squash fold here.

Step 9:  Square Base.
  That's the Square Base.  Easy and fundamental to our flower ball origami.  ^^

Terminology - Valley and Mountain Folds

Every origami starts off with either a Valley or a Mountain Fold.

A Valley Fold is a fold where the paper is folded into itself.  When unfold, the paper will form a "V" shape.

Here is an illustration:
Pic 1:  A paper folded diagonally into itself to get Pic 2

Pic 2:  Valley Fold

Pic 3:  Valley Fold as a result of paper being folded horizontally


With a Mountain Fold, the crease is folded away from itself to form a peak of a mountain.

Illustration as follow:

Pic 4:  A paper is folded diagonally away from itself to get Pic 5

Pic 5:  Mountain Fold

Pic 6:  Mountain Fold as a result from paper being folded horizontally


If we flip over a Mountain fold, we will get a Valley fold. For instance, flip over Pic 6, we get the "V" shape, and that itself is a Valley fold.

The difference between these two folds may not seem significant.  However, it will sure give an impact on how your folding turns out.  In most cases, the correct fold will help the paper to "fall into place" naturally.

To avoid confusion, I will indicate the side of the paper on which a mountain or a valley fold will be applied.